 The DEFT Homepage
Managing DEFT Projects
A documentation written in DEFT consists of a number of resources, such as projects, chapters with text, files with source code or models, images, and more. This section shows how to manage them.
Getting started
When you start DEFT for the first time you are asked to select a directory for the repository. Just enter a directory name or browse to the directory. The repository location can be changed later via the menu item.
When DEFT has started you see the main parts of the DEFT user interface: the Project Explorer for the management of the DEFT repository content, the Task View, which gives guidance hints if necessary, and the (still empty) editor window section.
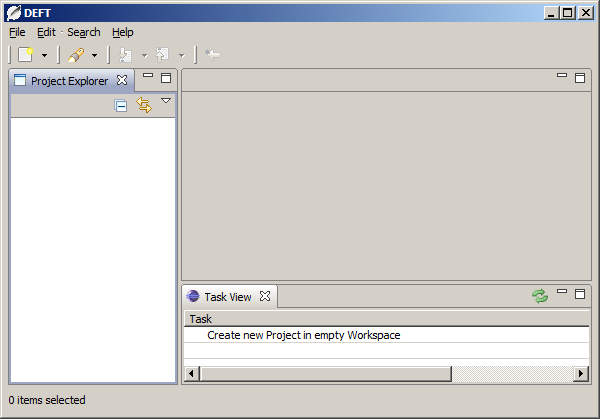
DEFT User Interface
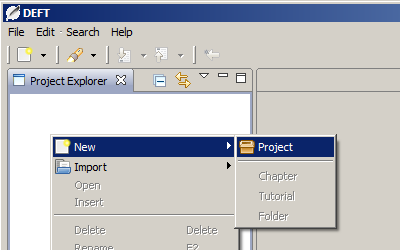
Creating a Project
A project can be created by right-clicking the Project Explorer and selecting . A dialog opens which lets you specify the project name and type. The project type defines the available document formats, word processors and kinds of generated content. The current version of DEFT comes with 2 project types: "LaTeX" for LaTeX and BibTeX documents, edited with the Texlipse editor, and "ODF Text" for Open Document Text documents, edited with OpenOffice or LibreOffice.
Creating a New Project
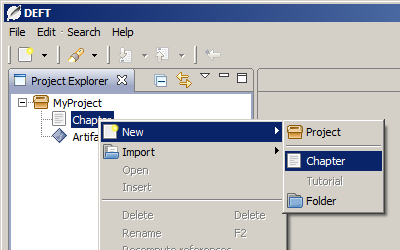
A project contains two categories, Chapter and Artifact. Chapters are the documents which contain the documentation, i.e. handwritten and generated content. Artifacts are the base software artifacts for the generated content, e.g. Java code files which can be transformed to code listings, or Ecore diagrams which can be transformed to images. Artifacts in the repository are mainly a copy of a file in the file system, the so-called source file.
Creating a Chapter
A chapter is created by right-clicking on the Chapter category and selecting . A dialog opens which lets you specify the chapter name. If there are multiple chapter types available (e.g. "LaTeX File" or "BibTeX File" for a "LaTeX" project), the chapter type must be specified as well. After clicking , the dialog is closed and an editor with the newly created chapter is opened.
Creating a New Chapter
Importing an Artifact
An artifact is imported by right-clicking on the Artifact category and selecting . A dialog opens which lets you select a source file. DEFT tries to identify the type of the source file according to its file extension. If there are multiple artifact types defined for one file extension, you are asked to specify the correct type. If the file content is valid with regard to its type (e.g. it is a syntactically correct Java file or Ecore model), then it is imported into the repository and displayed in the Project View. Otherwise it is not imported.
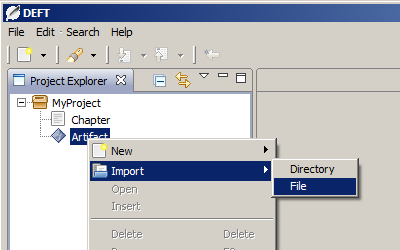
Importing an Artifact
Deleting a Project, Chapter or Artifact
A project, chapter or artifact can be deleted by right-clicking it in the Project view and selecting . Alternatively you can select the project, chapter or artifact in the Project View and press the Delete key.